When you stroll through a mall or amusement venue, you’ve likely been lured by the crane game—lights, music, and a claw gliding back and forth. But do you know the key parts of a claw machine, and why it sometimes grips firmly but other times slips? In essence, a unit coordinates a control board, power supply, gantry and carriage, motors, the claw, payment/reader, and a display; grip strength and the “payout rhythm” can be set to different standards, shaping player experience, operator reputation, and revenue. This guide systematically explains each component’s role, daily maintenance points, and selection advice—so operators, DIY enthusiasts, and players can understand it and put it to use.
Parts of a Claw Machine: Comprehensive Breakdown
We’ll analyze components layer by layer, explain functions and influencing factors, highlight frequent failure points with maintenance checklists, and provide practical comparison and inspection steps—so you can quickly judge a machine’s quality and make purchase or modification decisions.
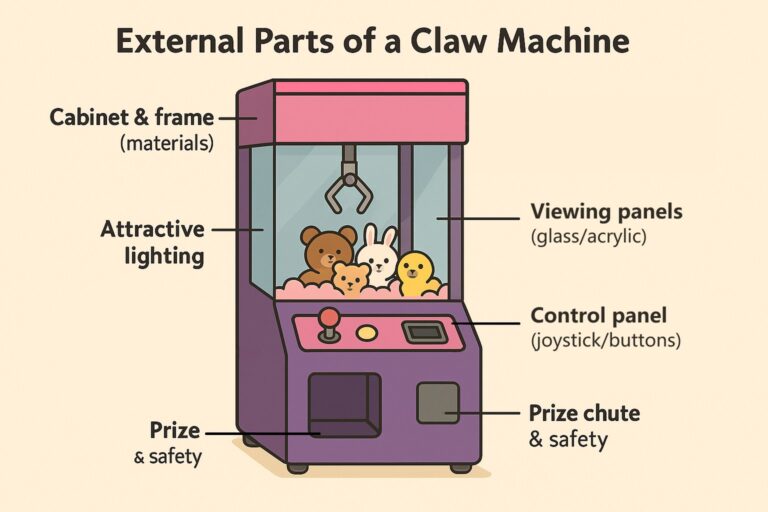
External Parts of a Claw Machine: The “Face” of User Experience
Cabinet & frame (materials)
Thick steel plate or aluminum alloy resists impacts and deformation—ideal for high-traffic sites; thin sheet metal or wood hybrids are lighter but less durable. A rigid shell and solid workmanship directly improve stability and reduce noise.
Viewing panels (glass/acrylic)
Tempered glass or high-clarity, scratch-resistant acrylic delivers a clearer display and easier cleaning. Lower-grade plastics haze and scratch over time, dampening the desire to play.
Control panel (joystick/buttons)
Feel and reliability shape play quality. Troubleshoot in this order: buttons/micro-switches → loose harnesses → mainboard ports.
Coin/bill/card acceptance & display
Support coins, bills, and card/NFC/QR. Clear score and countdown displays reduce disputes and boost replays.
Lighting & audio
Attractive lighting draws crowds—but balance energy use and upkeep. Keep volume adjustable to avoid complaints.
Prize chute & safety
A smooth prize path and anti-pinch design reduce jams and after-sales issues. Door locks and hinges affect security and inspection efficiency.
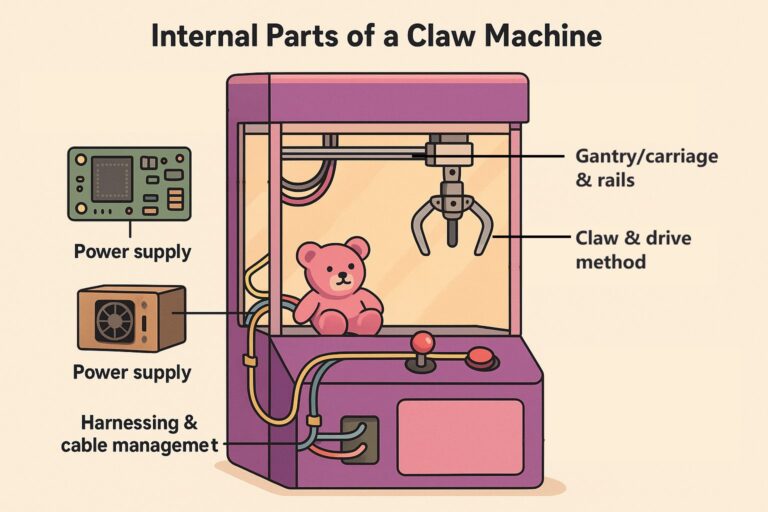
Internal Parts of a Claw Machine: The “Brain” and “Muscle”
Control mainboard (the “brain”)
Handles timing, grip strength, motor motion, and button signals. Fine-grained grip/timing control determines fair difficulty and consistency.
Power supply
The machine’s “heart.” Stable output prevents random reboots and weak performance—check this first when fault-finding.
Gantry/carriage & rails
Provide X/Y motion. Smooth travel and accurate homing improve aiming precision. Manuals usually include single-axis test modes for stepwise diagnosis.
Claw & drive method
Commonly electromagnetic or motor direct-drive; some use pneumatics. Experience and payout rate are tuned with sequences like “strong on drop → hold during lift → weak on return.” Operators adjust parameters such as pull/hold time to keep play exciting without being overly strict.
Limit switches & sensors
Ensure endpoints are reached and protect mechanisms; verify up/down/left/right status in test menus.
Harnessing & cable management
Properly fixed wiring reduces intermittent contact and EMI. During service, check first for looseness, breaks, or oxidation.
Build details (claw/bearings, etc.)
Stainless parts resist rust and last longer. Low-grade plastic gears or thin metal wear quickly, causing grip fluctuations.
Selection & Maintenance Summary (for Operators and DIY)
How to compare machines at the same price
Are the cabinet and clear panels durable and easy to clean?
Does the mainboard support detailed grip/timing adjustments (strong/weak/hold/pull time, etc.)?
Are the gantry and claw assemblies stable, with low noise?
Basic care cadence
Daily cleaning, weekly inspection, monthly lubrication. Keep a maintenance log to spot aging in buttons, wiring, and motors early.
Parts of a Claw Machine: Scenario Guide—Operator, DIY, and Player Essentials
For operators
Placement & display: Location almost decides success. High foot traffic ≠ high revenue; being a few steps from an entrance or beside queues/cashiers can change coin-in. The machine must be visible and easy to approach. Cinema lobbies, main mall aisles, and family-dining waiting areas are generally favorable.
Mix & layout: Use eye-catching lighting as a “lead-in,” place hot machines at focal points, and zone for kids vs. date-night themes to extend dwell time and replays.
Routine maintenance rhythm: “Daily clean, weekly check, monthly deep care.” Wipe panels and buttons, tighten loose hardware, lubricate rails and moving parts as needed, and keep logs to reduce failures and complaints.
Difficulty vs. reputation: Grip and payout cadence are adjustable. Too strong bleeds margin; too soft discourages play. A practical pattern is “mostly gentle → slightly stronger at key moments → normalize after a win” to control costs while maintaining fun and fairness.
For DIY builders/assemblers
Purchasing pitfalls: Prefer reputable parts and vendors. Choose scratch-resistant clear panels; buttons/joysticks with rated lifespans; fix harnessing/connectors to reduce looseness and oxidation.
Installation & calibration: Run single-function tests first (axes, claw open/close, lights, timer), then full system runs. For grip tuning, follow “lift reliably first, then ensure it holds during ascent.”
Common fault flow: Check from outside in: panel/buttons → wiring → power → motion assemblies → control settings. Record every swap and setting change for future reference.
For players/fans
Fairness & experience: Most claw machines blend skill and chance. Operators can vary grip strength and “when it’s easier to win.” Watch a few plays first; pick prizes with good positioning or those that can wedge on edges.
Practical tips: Test aiming and “nudging routes.” First move a prize closer to the chute or an edge. Don’t expect a one-grab win; reposition it into a favorable spot .
Parts of a Claw Machine: Maintenance & Troubleshooting Handbook (Practical Tools)
Daily/weekly/monthly maintenance checklist (post inside the cabinet)
Daily: Wipe the shell and clear panels; clean coin/reader slots and the prize chute; play a test round to confirm buttons/joystick, countdown, and chute operation.
Weekly: Check for loose buttons and wiring; look for oxidized connectors; vacuum or blow dust from the interior and fan inlets.
Monthly: Lubricate rails/slides and other moving parts; verify power-output stability; run a single-function test (axes, claw actuation, lights/display).
Quarterly/semiannual: Full checkup—clean the interior, re-check ground and fasteners, test PCB and sensors; replace wear parts as needed.
Quick fault triage (symptom → possible cause → fix)
Claw can’t hold / drops immediately → Settings too weak or hold time off; claw drive worn. → Increase grab/lift hold according to prize weight; if no improvement, inspect the claw motor/driver.
Claw won’t move vertically / stuck mid-travel → Upper/lower limit switch failure; cable kinked or loose. → Test limits, re-route or rewind cable; replace switches if needed.
X/Y movement rough / misaligned → Dust on rails, dry or loose sliders; incomplete calibration. → Clean and lubricate; run home/self-test.
Buttons/joystick unresponsive → Dirty contacts or loose harness; panel connector loose. → Clean contacts, reseat connectors; replace buttons if required.
Coin/card failure → Dusty or misaligned path. → Clean, reseat, and recalibrate per the manual.
Random reboot/black screen → Unstable PSU, loose wiring. → Measure and stabilize voltage; check joints and ground. Seek a professional for electrical tests if unfamiliar.
Mainboard damage (burnt smell/marks) → Electronic component failure. → Record the model and replace the whole board to avoid repeated piecemeal fixes.
Grip & Difficulty Tuning Pocket Card
Principle: “Grab → Lift → Return” in three stages. First ensure the claw can pick up, then maintain adequate hold during ascent; tune per prize type/weight.
How-to: Enter settings (or use knobs) and adjust grab strength / lift hold / return strength stepwise. After each change, test three times. Over- or under-tuning hurts both reputation and revenue.
Spare Parts & Consumables Matching Guide
Power supplies: Match output voltage and allow headroom; choose reputable models with after-sales support.
Buttons/joysticks/limit switches: Confirm sizes and connector types; batch replacement saves time.
Claw assemblies/cables: Match the machine model and load rating; check for kinks and burrs before installation.
Cleaners/lubricants: Use neutral cleaners and soft cloths for shells and clear panels; silicone-based lubricants for moving parts to prevent corrosion.
Usage tip: Print the A–D cards (checklist, triage, tuning, spares) on one sheet for each claw machine. Beginners should troubleshoot in the order A → B → C, and hand off electrical or board-level issues to professionals to minimize downtime.

FAQ
What are the parts of a claw machine?
The key Parts of a Claw Machine are: cabinet & frame, viewing panels, control panel (joystick/buttons), coin/bill/card acceptance & display, lighting & audio, prize chute; internally: control mainboard, power supply, gantry/carriage & rails, claw & drive, limit switches & sensors, and wiring/harnessing.
Do claw machines have sensors?
Yes. Limit switches and sensors confirm up/down/left/right endpoints and protect the mechanism; their status can be verified in test menus.
What are the controls on a claw machine?
A joystick and buttons on the control panel. When diagnosing input issues, check buttons/micro-switches → wiring harnesses → mainboard ports in that order.
What is the rail system of a claw machine?
The gantry/carriage & rails provide X/Y motion. Smooth rails and accurate homing improve aiming precision; manuals typically include single-axis test modes.
How are claw machines programmed?
Via the control mainboard, which handles timing, motor motion, button signals, and grip logic (including payout cadence). Operators can fine-tune grip/timing parameters.
Do claw machines have settings?
Yes. Grip strength and timing (e.g., strong on drop, hold during lift, weaker on return) plus pull/hold time and other parameters are adjustable.
How to adjust claw machine settings?
Enter the settings/test menu (or use hardware knobs), adjust grab/lift/return strengths and hold/pull times stepwise, and test at least three plays after each change.
Do claw machines change grip strength?
They can. Many machines use sequences like “strong on drop → hold during lift → weak on return,” tuned by the operator to balance fairness and cost.
How to set claw machine strength?
Follow the “Grab → Lift → Return” stages: first ensure it can pick up, then ensure lift hold, then set return strength. Adjust gradually and re-test three times.
How do claw machines decide when to grip tight?
The mainboard’s settings and the operator’s chosen payout rhythm control when the claw is strong, holds, or relaxes; it’s configurable per prize type/weight.
How rigged are claw machines?
Difficulty is operator-set. Over-weak settings hurt replay rates; overly strong settings bleed margin. A balanced pattern is “mostly gentle → slightly stronger at key moments → normalize after a win.”
How do you maintain a claw machine?
Use a cadence: daily cleaning; weekly inspections; monthly lubrication and single-function tests; periodic full checkups. Keep a maintenance log to catch aging parts early.
Do claw machines have a maintenance mode?
Most include test/diagnostic functions—such as single-axis tests and input checks—accessible via the settings/test menu per the manual.
How to put a claw machine in maintenance mode?
Open the settings/test menu (model-specific) and run input, axis, and claw actuation tests. Follow the manual for entry steps and safety interlocks.
Why is my claw machine not grabbing?
Likely causes: grip/hold settings too weak or hold time incorrect; worn claw drive. Increase grab/lift hold for the prize weight; if no change, inspect the claw motor/driver.
Why is my claw machine not working?
Use outside-in triage: control panel buttons → wiring/harnesses → power supply stability → motion assemblies and limit switches → mainboard settings; log each change.
Why is my claw machine so weak?
Weak PSU output, worn claw components, or conservative grip/hold settings. Verify PSU voltage first, then adjust grip/hold, and inspect the claw assembly for wear.
How to fix claw machine claw not closing?
Check the button/micro-switch and wiring to the mainboard, verify the claw driver/motor, and confirm limit-switch status in the test menu; replace faulty switches or drivers as needed.
How to adjust tension on a claw machine?
In settings, tune pull/hold time and grab/lift/return strengths to match prize weight; clean/lubricate moving parts so mechanical friction doesn’t dilute set tension.